Sunday, December 29, 2013

Apple Credits to Eligible Users Who Bought iWork after Sep.1


In the Apple's September event, Tim Cook, the CEO of Apple Company, announced that all users who bought new iOS devices after September 1st could get a free access to iWork and iLife apps. While, before the announcement, many users have paid for these apps earlier in the September, or paid for them because of their confusion about claiming the free versions.

Now, Apple Company has begun sending out emails to those users who paid for the apps, noticing that they are going to get a full refund via their iTunes account for the apps they should have got for free. From the feedbacks, the credit amounts are not the same to everyone. It depends on which app they have paid for, not including the total price of all five apps.

The refund will be returned to users via an iTunes Store redeem code attached in the email. Here you can read the whole content of the email:
"Dear iTunes Customer,
On September 10, 2013, Apple announced that iPhoto, iMovie, Keynote, Pages, and Numbers iOS apps are now available as a free download on the App Store for qualifying iOS 7 compatible devices activated on or after September 1, 2013.
Our records indicate that you purchased one or more of these apps on or after September 1, 2013 so we have provided you with the iTunes code below in the amount of $5.34. This credit can be used towards the purchase of any content on the iTunes Store, App Store, or iBooks Store.
Detailed instructions for redeeming the code can be found at http://support.apple.com/kb/ht1574.
Code: [redacted]
Thank you and we hope you enjoy using this credit towards your next purchase on iTunes.

Regards,
iTunes Customer Support
iTunes Support"

If you have received an email like this from Apple, scroll down to get your redeem code and check your refund in your iTunes account. If not, contact Apple and let them know your situation. 

You can read more iOS information and Android news here.

Sunday, December 22, 2013

1 Password 4.0 for Mac is Available with iCloud Sync and More


It is not unfamiliar for many users that 1Pawssword can remember all the passwords for your accounts and allow you enter all of them only with the master password. It is a perfect application that keeps your passwords safe and secured between different accounts. Windows, Mac, iOS and all the popular Android OS are supported. It has gained more and more popularity, especially in iOS users.

1Passwords data are all well encrypted and saved on the local hard disk, supporting multiple browsers like IE, Firefox, Google Chrome, Safari, and Opera. After installing, once you login in a website which needs the passcode, 1Password will reminds you whether to store the login information for this site. You will only need to unlock 1Password using your master password to enter any saved sites next time. Click on the 1Password button, enter your master passwords, and then all the passwords of sites will be visible. Therefore, 1Password helps you access to all your accounts no matter how many or how complex the passwords are. One master password tackles everything for you. Surely, more features are realized with 1Password, making it your perfect password master and manager. Undoubtedly, you need to spend $49.99 for Mac version or Windows version. 

Good news comes that 1Password 4.0 for Mac is now available with completely redesigned interface. According to reports, the new version will be compatible with the upcoming OS X Mavericks. Users now can create multi vaults for saving personal info apart from your business stuff. You can also share the vaults or items between working partners and family members by securely sending emails or iMessages. 

Moreover, the update version comes up with 1Password Mini, a full-featured menu-bar utility with vault search, item details, vault switching, window anchor options, and more. You even don’t need to open the app. Other features include: Favorites, third-party App integration, Dropbox/iCloud/Wi-Fi sync, all-new browser extension like Opera support, 256-bit authenticated encryption and so on.

Now, 1Passward 4.0 for Mac is on sale in Mac App Store (MAS). New customers just need to pay $39.99 for it, as a 20% cut from the regular price of 49.99. Users who have purchased 1Password 3 from MAS or AgileBites online store this year can have a free update to 1Password 4. Take this chance and enjoy this wonderful password manger designed for you.

More Latest news are online for you. Visit us and know more.

Monday, December 16, 2013

How to Recover iPhone Data without Backup

Many iPhone users know that their data can be recovered by the backup. But there are some people ask me that they didn’t backup their data like photos, messages, contacts and so on. And when they delete the files, something bad will be happen. But how to recover the data without backup can be easily solved in fact. And today, I will introduce a software to help you get the files back without backup.
iPhone Data Recovery is a professional iOS Data Recovery, which is designed to assist you to recover lost data from iPad, iPhone or iPod touch, even without iTunes backup file. You are allowed to retrieve camera roll photos, videos, photos, contacts, messages, call history and so on from iPad 4/mini/3/2/1, iPhone & iPod touch 4.
How to Restore iPad Lost Data without iTunes Backup
Before all, download and install iOS Data Recovery (Mac) or iOS Data Recovery (for Windows) on your computer. Here we take Windows version for an example. The steps are similar with Mac version.


Step 1 Run the Program and Connect your iPad to the Computer
Run the program on your computer now. Then connect your iPad to the PC to be recognized.
There are two options for different model of iPad:
For iPad with Retina display, iPad mini, The new iPad and iPad 2, it will prompt you to click Start Scan button to scan your device directly.
For iPad 1, the program will ask you to download a plug-in before scanning.

Step 2 iPad 1 Enter the DFU Mode and Scan for Lost Data
Note: iPad with Retina display, iPad mini, The new iPad and iPad 2 will skip this step.
As you don't have iTunes backup, select "Recover from iOS Device" and follow the tips shown in the window:
1) Hold your iPad and click "Start".
2) Hold "Power" and "Home" buttons on your iPad simultaneously for exact 10 seconds. The program will count the remaining time for you.
3) Release the "Power" button after 10 second, but keep holding the "Home" button for another 10 second until you are informed that you've successfully entered the DFU mode.
Then, the program will start scanning your iPad for lost data automatically.

Step 3 Preview, Check and Recover iPad Lost Data
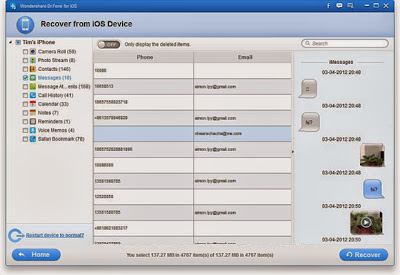
Wait until the scanning finishes. You will get the results in a list on the left of the interface. Click the file icon you want to see and preview the details, such as "Camera Roll", "Photo Stream", "Contacts" and so on. Check those you want back and click "Recover". You will be asked to choose a folder on your computer to save the recovered data.


Note: You can slide the button at the bottom to only display the deleted items, so you can find what you want to get back more directly and quickly.

And after three steps, the data you lost can be appeared again. And you can also go to http://www.recovery-android.com/ to find more information about recovery. Any question please contact me.


Monday, December 9, 2013

How to Recover Lost Video on iPhone

             
With the convenience and the clearness of taking videos by iPhone, we may store many important videos in our iPhone like the wedding day, a birthday party and so on. But we also meet the similar occasion as delete the videos by pressing a wrong key or just lose all the data in the iPhone. If you want to recover the videos on iPhone, you can try iPhone Video Recovery.
iOS Data Recovery is specially designed for iPhone users, which enables them to manage their data more effectively. It is used for recovering different kinds of deleted files. Particularly, by extracting iTunes backup or directly scanning iPhone, it can quickly restore iMessage, which is of great significance for users. Now let me show you in details.
Before the concrete steps, you can download the free trial version of the software below to make an attempt. After downloading, install it to your PC.  


Part 1: Retrieve iPhone iMessage from iTunes backup files
Step 1 Extract iTunes backup data
Enter this recovery mode, all backup files of your iPhone will be listed automatically. Choose the the one latest backup date and click "Start Scan". The app will begin extracting your backup.

Step 2 Check and recover lost iMessage from iPhone
After the extracting ends, the whole backup are listed in details. Find "Messages" on the left side and preview details of your messages. Mark your wanted files and click "Recover" button on the top, then you can get your content saved on your computer.

Retrieving message attachments in your iMessage is also allowed via the app. Just simply click “message attachments” button.
Part 2: Recover iMessage files by scanning your iPhone
Step 1 Enter your iPhone's system
First get into the iPhone's system before scanning it. Please follow the steps below:
Hold your iPhone and click the “Start”.
Keep pressing the Power and Home buttons meanwhile for 10 seconds.
After 10 seconds, please release the Power button immediately, while keep holding the Home button. When 15 seconds have passed, you can release the Home button if you are prompting that you’ve successfully entered the device system.

Step 2 Start scanning your device.
Tick “start scan” after entering the system.
Note:Just continue if your iPhone is in a black status. But to get your iPhone back to normal, you can press "Restart Device to Normal".

Step 3 Preview and recover your selected deleted iPhone iMessage.
It's the time to check your previous data now. Just find the data you want to recover and click "Recover" to save them on your PC.

Please select "Messages Attachments" for recovery if you want to retrieve message attachments from your iMessage.
For Windows users, download and use iOS Data Recovery by similar steps, or you can read the relative passages on our network.


Monday, December 2, 2013

How to Recover iMessage from iPhone

When we are at a meeting or some occasion that we can’t talk, we may like to send messages by our phone. iPhone users are no exception. And because of the messages, we can make communications with our friends, family, or other people more conveniently. But once we lose some even all the messages in our iPhone, we may get into a panic. So how can we get back iMassages from our iPhone?
iPhone iMassages Data Recovery is specially designed for iPhone users, which enables them to manage their data more effectively. It is used for recovering different kinds of deleted files.
        

Note that the instructions below are based on Mac system.
First, choose a device type and a recovery mode.
You'll see the primary window of iOS Data Recovery (Mac) after launching the software. Select your iPhone type and here we take iPhone4 as an example.

Two ways to follow: Apart from extracting your iTunes backup file, you can also directly scan your iPhone. Note that only if you have synced your iPhone with iTunes before can you choose the former way. Otherwise, switch to the latter one.

Part 1: Retrieve iPhone iMessage from iTunes backup files

Step 1 Extract iTunes backup data
Enter this recovery mode, all backup files of your iPhone will be listed automatically. Choose the the one latest backup date and click "Start Scan". The app will begin extracting your backup.

Step 2 Check and recover lost iMessage from iPhone
After the extracting ends, the whole backup are listed in details. Find "Messages" on the left side and preview details of your messages. Mark your wanted files and click "Recover" button on the top, then you can get your content saved on your computer.

Retrieving message attachments in your iMessage is also allowed via the app. Just simply click “message attachments” button.

Part 2: Recover iMessage files by scanning your iPhone

Step 1 Enter your iPhone's system
First get into the iPhone's system before scanning it. Please follow the steps below:
Hold your iPhone and click the “Start”.
Keep pressing the Power and Home buttons meanwhile for 10 seconds.
After 10 seconds, please release the Power button immediately, while keep holding the Home button. When 15 seconds have passed, you can release the Home button if you are prompting that you’ve successfully entered the device system.

Step 2 Start scanning your device
Tick “start scan” after entering the system.
Note:Just continue if your iPhone is in a black status. But to get your iPhone back to normal, you can press "Restart Device to Normal".

Step 3 Preview and recover your selected deleted iPhone iMessage.
It's the time to check your previous data now. Just find the data you want to recover and click "Recover" to save them on your PC.

Please select "Messages Attachments" for recovery if you want to retrieve message attachments from your iMessage.
For Windows users, download and use iOS Data Recovery by similar steps, or you can read the relative passages on our network.

Two ways to get back the iMessages back have been introduced. You can choose the one you like. And if you have any questions about the procedures, you can leave your messages. We will reply to you as quickly as possible.

Monday, November 18, 2013

How to Free up iCloud Storage Space

There are two ways can help you solve "Not Enough Storage" in your iPhone iCloud.
If you have enough money, you can buy more storage for your iCloud.
Step 1. Open the "Settings" app on one of your iOS devices and tap "iCloud".
Step 2. Scroll down and tap "Storage & Backup".
Step 3. Select "Change Storage Plan".
Step 4. You can buy more storage as you like.

Trim the app fat
Step 1.Go to Settings – iCloud - Storage & Backup – Manage Storage
Step 2. You should see a list of apps displayed with the space each uses up. Choose the device you want to manage.
Step 3.Once inside, you can TURN OFF the switch against the apps that you don’t want to backup.

Both the two ways can help you get out of the problem. And if you have any questions, you can leave your messages.

Tuesday, November 12, 2013

How to make ringtones by iTunes

You may know that iTunes provides ringtones for us to download, but it needs money. So how can we transfer the music to M4r and sync them to our iPhone to be the ringtones?
1 Launch iTunes and find preferences. Check "Tones". Then the interface will appear. Select "Add Tones to Library".
2 Right click the songs you choose and select "Get Info". Then choose "Options" to fill in the "Start Time" and "Stop Time" (in 40 seconds), after that, click "OK". If you have made a ringtones, just convert directly.

3 Right click the song again, and select "Create ACC Version".

4 Right click the song you create, Select "Show in Finder", rename the file extension from ".m4a" to ".m4r". And click "Yes" on the interface appear. Then your ringtones will be made.

5 Next, go back to iTunes. Right-click on the song you have created and select "Delete".

6 Click "Remove" to confirm the removal and then click "Keep File" when you’re prompted. This instructs iTunes to remove the song (the 30 sec version) from iTunes library and keep the actual file.

7 Go back to Finder and double-click on the ringtone file (.m4r) you have just renamed. The ringtone will automatically add it to iTunes’ ringtone library. You can now sync it to iPhone using iTunes. Enjoy your new ringtone!


Sunday, November 3, 2013

How to Get iPhone out of Recovery Mode

             
More and more iPhone users are like to have iPhone jailbreak, restore a backup or update a new firmware, then you may have to end the recovery mode. You will find unexpected errors that can leave your device stuck in either DFU or Recovery mode. The same can happen if you intentionally put your device in Recovery mode to solve an issue but for some reason then it stops responding just then. When faced with this problem, don’t worry, just follow the steps below.
Before you start the steps, you should know a useful tool named iPhone Data Recovery. It enables to get your iPhone out of recovery mode or DFU without erasing any data like pictures, videos, contacts and so on.
Please get the trial version of iOS Data Recovery, or iOS Data Recovery (Mac) below for a try.

Part 1: Get your iPhone out of recovery mode or DFU with one click

Run the program and connect your iPhone to the computer. After your iPhone is detected by the program, you'll get a start window.
If you are using iOS Data Recovery (Windows), the window will be like the one below. You just have to click the blue icon "Restart", then your iPhone will be restarted and return to normal in a few seconds.


 If you are using iOS Data Recovery (Mac), the window will be like the one below. Please hit the Set Up button to restart your iPhone to normal.
After your iPhone is back to normal, you can go on using iOS Data Recovery to recover lost data from your iPhone, or backup data on your iPhone to your computer, if you want.

Part 2: Recover data from your iPhone

Step 1 Scan your iPhone
If your iPhone is iPhone 5 or iPhone 4S, you'll get the window below. You just need to click Start Scan to begin scanning your iPhone 5/4S.

If your iPhone is the iPhone 4/3GS, you will be asked to download a plug-in first. Do it. After that, please enter the scanning mode by following the steps below:
1. Hold your iPhone and click "Start".
2. Hold the Power and Home buttons at the same time for exactly 10 seconds.
3. Keep holding the Home button, but release the Power button, and, until you've entered the scanning mode successfully.

Step 2 Preview and Recovering
After the a few minutes' scan, the program will show you all found recoverable contents on your iPhone. You can only tick the catalogues you want to retrieve. You can also switch the button on the top to selectively preview the files one by one. Then mark those you want and click Recover to restore and save them on your computer.

So when you faced with the problem of ending the recovery mode, you can try the two ways above. And if you have other questions about the procedures, you can leave your messages. I will reply you as soon as possible.

Tuesday, October 15, 2013

How to Retrieve Text Messages from iPhone

Many people like to send messages by their phones. It is also common for iPhone users. And it may occur that you delete your text messages accidently or just all your messages have gone. Then you would feel anxious. But you can restore your text messages from iPhone by using an iPhone text recovery tool. And today I want to suggest iOS Message Recovery to you.
It's actually as easy as plugging your iPhone into the PC or Mac and choosing the messages you want to restore. Not only is iOS Data Recovery able to recover text message but also other files like photos, contacts, videos, audio, calendar, call history, bookmarks, etc.


Then I'd like to share two valid and simple methods to retrieve iPhone SMS. These methods could be used for all iPhone versions as iPhone 5, iPhone 4S, iPhone 4, iPhone 3GS etc.

Method 1: How to directly scan and recover SMS from iPhone

Step 1 Connect your iPhone 4 to computer
Connect your iPhone 4 to the computer and run the program after installing it. An interface below will display, you need to download a plug-in by clicking the "Download" button.

Step 2 Enter iPhone 4 into DFU mode and start scanning
Then, you need follow below steps to get your iPhone 4 into DFU mode before scanning.
1) Hold your iPhone and click "Start" button.
2) Pressing "Power" and "Home" buttons simultaneously for 10 seconds.
3) After 10 seconds, release "Power" button, but keep holding "Home" for another 10 seconds.
After that, you'll get a message saying that you've successfully entered the system, and the software begins scanning your iPhone.

Step 3 Preview and recover iPhone messages
After finishing scan, all recoverable data like Photos, Contacts, Messages, Call History, Calendar, Notes, Videos and more will be listed in the left side of the window.
Choose "Messages" to preview the detailed content. Mark those you want and click "Recover" to save them on your compute with one click.

Note: If you only want back your deleted ones, you can refine the scan result by using the slide button at bottom to only display deleted items.

Method 2: How to extract iTunes backup to recover iPhone SMS

Step 1 Recover iPhone SMS from iTunes Backup File
If you have backup your iPhone 4 before, you can choose "Recover from iTunes Backup File" to find all your lost SMS back. When you get the interface as follow, choose iPhone 4 and click "Start Scan".

Step 2 Preview and retrieve iPhone SMS
When the scan finishes, all the content contained in the backup file will be extracted and displayed in categories as Photos & Videos, Contacts, Messages, Call History and Notes. You can preview the detailed content of any of them before you perform the SMS recovery for iPhone.
To recover deleted text messages from iPhone 4, you only need to check the "Messages" option and hit the "Recover" to save all the messages on your computer.

Step 3 Do backup well
To avoid losing your important SMS messages, immediate backup is very important and useful. Do remember to backup them on your computer well.

Both the two ways can be easily operated, and you can choose any one you like. And if you have any questions about the procedure or the product, you can contact me.

Sunday, October 13, 2013

How to Recover Deleted Bookmarks on iPhone

It happens sometime we enter the delete button. It leads to lose some important files like bookmarks. But we can’t get them back at once, and then we will get crazy to lose some of the important book marks. In fact, that would be OK to delete them accidentally. No matter you have sync them with iTunes or not, you can also recover the deleted bookmarks on iPhone.
iPhone Bookmarks Recovery or iPhone Bookmarks Recovery (Mac) is a third-party program to extract the iTunes backup. It enables you to reach iTunes backup files, or directly scan your iPhone to recover bookmarks with ease.
Please download the free trial version of iPhone Bookmarks Recovery below to have a try.


Mac Version for iPhone/iPad/iPod

Here let's take Windows version for a try. Install it on your computer and run it.
Step 1 Select the recovery mode and prepare for scan 
Launch the program, select the "Recover from iTunes Backup File" mode, then you'll get a window as below. On the list of iTunes backup files for your iOS devices, you just need to choose the one for your iPhone and click "Start Scan" to begin scanning.


Step 2 Preview and recover bookmarks
After a few seconds' scanning, the result will be display on the window. You can narrow down the result by only tick the safari bookmark catelogue on the left column and click the icon on the top of the list to only display the deleted items. Then you can preview the bookmarks one by one.
Choose those you want to bring back and click the "Recover" button to restore and save them on your computer.

Just 2 steps can help you to recover your deleted bookmarks. It is easy to operate. iPhone Bookmarks Recovery can not only get back the bookmarks, but also recover the messages, notes and so on.


Saturday, October 12, 2013

How to Recover Deleted Notes from iPhone

Many iPhone users like to bring their iPhone with them no matter where they go. And when we want to remember some important things like the contents of a meeting or something others, we usually take notes with iPhone for convenience. But once we delete some of them, we may lose some important information. Don’t worry, let iPhone Notes Recovery help you recover the deleted notes from iPhone.
iPhone Notes Recovery is a professional recovery software available in the market, which will assist you to recover deleted notes even all lost data from your iOS device, including camera roll, contacts, messages, call history, videos and more other files.


Here we provide you two different ways to get the deleted notes back, follow the step-by-step guides below in two parts and get more details. Here we take iPhone 4 for an example:

Part 1: Scan and Extract iTunes Backup to Recover iPhone Notes

Step 1 Select Device & Recovery Mode
Before we begin, download and install iPhone Notes Recovery on your computer. Open the program and select the model of your device in the main interface. (Here we take iPhone 4 for an example) Then, choose "Recover from iTunes Backup File" to continue.

Step 2 Scan and Exact iTunes Backup File for your Device
In the window below, choose the latest backup file for your iPhone 4 if there is more than one file. Click "Start Scan" then.

Step 3 Select and Restore Deleted Notes
After you get the scanning results, expand "Notes" icon and you can selectively choose which one you want to retrieve by previewing them one by one. Check those you want back and click "Recover". Done. The deleted or lost notes will be restored on your computer.

Note: This way works well for all types of iOS devices but needs iTunes backup. Make sure your device is backed up constantly in case of data loss.

Part 2: Scan your iPhone to Recover Deleted Notes directly

Step 1 Connect your Device to Computer and Select the recovery mode
Run the software and connect your iPhone to the computer. Choose the your device model and select "Recover from iOS Device".

Step 2 Enter Device System to Scan for Lost Notes
As the window shows, follow the three tips below to enter the DFU mode.
1) Hold your device and press "Start" button.
2) Hold "Power" and "Home" buttons simultaneously for exact 10 seconds.
3) Release the "Power" button after 10 seconds but keep holding the "Home" button for another 10 seconds. Release it until you are informed successfully entering device system. Then click "Start Scan" to find out your iPhone deleted data files, including notes.

Step 3 Restore Deleted Notes on your Computer
When the scanning completes, check to unfold "Notes" icon on the left, under the name of your device. Preview and check the ones you want back, and then click "Recover" to retrieve them back.

Note: This way only works well for iPhone 5/4S/4/3GS, iPad 1 & iPod touch 4, if your device is not supported, turn to part 1 for recovery.

All the two ways have been introduced. No matter which one you choose, you can also get back your notes. iPhone Notes Recovery can not only retrieve your notes, but also get back your photos, contacts and do on. It is really helpful.

How to Recover Deleted Photos from iPhone

No matter you are using iPhone 5, iPhone 4/4S or other iPhone versions, you may be used to take photos with your iPhone. With times gone, you may have so many cherish pictures like wedding day, birthday or some others in your iPhone. Once you delete some even all photos by accident, that would be a great pity. And when you faced with this question, you can use iPhone Photos Recovery.
iPhone Photos Recovery is an effective as well as reliable recovery software that can help you recover all your deleted photos back without any quality loss. Here we provide two solutions for you to figure out how to recover deleted photos from iPhone.


Way 1: Recover Deleted Photos Directly from iPhone

Currently, This iOS Data Recovery can only allows you to directly scan and recover photos from iPhone 4/3GS. For iPhone 5 and iPhone 4S, you need to recover from iTunes backup.

Step 1 Connect your Device and Choose the Recovery Mode
First of all, download and install iOS Data Recovery on your computer. Run it and connect your iPhone to the computer. Then, choose "Recover from iOS Device" as the recovery mode in the window below.
Note: Before you can scan lost data on your iPhone 4/3GS, you need to click "Download" button to download a plug-in, so that you can go next step.

Step 2 Enter DFU Mode and Scan for Deleted Photos
Here follow the steps below to enter DFU mode so that you can scan for deleted/lost photos from your iPhone.
1) Hold your iPhone and click "Start" in the main interface below.
2) Hold both "Power" and "Home" buttons for simultaneously 10 seconds.
3) Release the “Power” button when the time is up, but keep pressing the "Home" button for another 10 seconds. When iOS Data Recovery informs your successfully entering DFU mode, release it. it will automatically scan your iPhone 4 for deleted data files, including camera roll, contacts, messages, etc.

Step 3 Preview and Recover lost Photos
After the scanning, you'll get the interface below. Scanning results are listed on the left, in categories. Check "Camera Roll" or "Photo Stream" and preview them one by one or selectively. Click those you'd like to get back in and press "Recover" button. Now, your lost photos are back.
Note: You'll be shown all photos in the scanning results, including those having been deleted and still on your iPhone. Slide the bottom button to only display the deleted items as you wish.

Way 2: Restore Deleted Photos from iTunes Backup


Step 1 Select the Recovery Mode
Run the program on your computer, and choose the type of your device. When comes to choose a recovery mode, select "Recover from iTunes Backup File".

Step 2 Scan the Backup File
Choose the backup file of your device in the window below, and click "Start Scan". Then you just need to wait for the scanning results.

Step 3 Check and Recover deleted Pictures
Select "Camera Roll" icon or "Photo Stream" in the lists of scanning results. Now you can preview the deleted or lost pictures and make your choice to recover whatever you want, by simply checking and clicking "Recover" button.

Note: This way works for all iPhone models but requires a backup on iTunes. Most of all, remember to back up your device regularly in case of data loss.

Both the two ways can help you recover your photos. And if you lose your contacts want to get back, you can go to How to Recover Contacts from iPhone5.

Thursday, September 26, 2013

How to upload videos/pictures/music to iPhone

For many new iPhone users, it would be confused and insensible to upload videos, pictures and music to iPhone. Today, I will introduce you how to upload in detail.

How to upload videos to iPhone
1 Upload by iTunes
  No matter you jailbreak your iPhone or not, the most reliable and safe way to upload videos is using iTunes. But you must make sure the video format is MP4. And you can convert your video to MP4 format by some converter downloaded from Google. Here comes the procedures:
Step 1 Firstly, you should connect you iPhone to your computer. And then, launch your iTunes. If you don’t have iTunes, you can just download from Google.
Step 2 When your iTunes identify your iPhone successfully, click the “Movies” button on the top left. Then you can enter to the iTunes Movies page.
Step 3 Click the “Files” on the top left, select “Add Files to Libarary”.
Step 4 Find your movies and click to add to the databases.
Step 5 Then the video you just upload will appear in iTunes Moveis
Step 6 Click “Devices” on the left, select your iPhone and then click “Movies” on the top right(some versions appear “Video”). After checking Sync Movies, you can see the movie you just upload is among them.
Step 7 Click “Sync” on the bottom right corner, then start to sync.


Step 8 After syncing, you can enjoy your movies on your iPhone.

2 Upload by iFunbox
  If you want to upload your video, you must install a video player. I’d like to recommend some powerful video payer to you such as Avplayer, Rushplayer, Goodplayer. And I take Goodplayer as an example to teach you how to upload video to your iPhone by iFunbox.(Generally speaking, these player can support so many video formats for exmaple Goodplayer can play AVI,Xvid, Divx, WMV, RM, RMVB, AC3, HTTP and so on but don’t need to transfer.)
Step 1 Firstly, launch iFunbox and click “File System”-“var”-“mobile”-“Goodplayer”-“Documents”.
Step 2 And then “Copy from Computer”, select the video you want to upload.

Step 3 After uploading then you can play the videos on Goodplayer.

How to upload pictures to iPhone
Step 1 uploading pictures is easier than videos. Just launch iTunes, click iPhone under Device. And then click Picture-Select a File-select the file you store your pictures, at last click OK.

Step 2 Click “Sync” on the bottom left on iTunes (Some version need to click ‘Applications’ then click ‘Sync’), at last sync pictures to your iPhone.

How to upload music to your iPhone
Step 1 Launch iTunes, click “Music” on the top left.
Step 2 Click “Files”-“Add Files to Library”-select the songs you want to upload.
Step 3 At last, click “Sync” on the bottom right.

The procedures I provided are detailed. In fact, it is easy to upload videos, pictures and music to iPhone. And after you do it a few times, you will totally handle it. I hope this passage can help you.

Saturday, September 21, 2013

How to Restore Lost Contacts on iPhone


Nowadays, iPhone users are used to make telephone calls or send messages by their iPhone. So we must store the contacts of people to iPhone. But when you lose your contacts by accident, you may be crazy to look for the person’s contacts from other people or just lose touch with him or them. That would be a pity. In fact you can restore the lost contacts on iPhone from an application. Then you can get out from the problem.
And no matter you have or haven't backup your iPhone to iTunes or iCloud before, you have a big chance to restore lost contacts on iPhone with this iPhone Contacts Recovery. And it can also help to scan and retrieve contacts directly from your iPhone, if you didn't lose your iPhone.
Download the iPhone contacts recovery tool to your computer to have a try.


This iPhone contacts recovery software supports your two ways to get back all lost contacts easily:

Way 1: Extract iTunes backup to restore iPhone contacts


Note: Don't connect or sync your iPhone with iTunes after you lost your contacts, to prevent the backup file from being updated and replaced by the contacts on your iPhone now.

Step 1 Scan the backup file from iTunes
Install and run the program on your computer, then choose "Recover from iTunes Backup File", select your iPhone backup file and click "Start" button to begin scanning your lost contacts.

Step 2 Restore iPhone contacts from backup
After the scan finishing, all your contacts will be found and listed in the right window of the program. Choose contacts you want and click "Recover" button to save them on your computer.


Way 2: Scan and recover contacts from iPhone directly


Note: If you can't recover those contacts from iTunes backup, you can follow this way to retrieve your contacts directly.

Step 1 Connect your iPhone to the computer
Connect iPhone to computer via a USB cable, then choose "Recover from iOS Device".

Step 2 Analyze and scan iPhone for lost data
Just click the "Start Scan" button to let the program begin analyzing and scanning your iPhone for the lost files.

Step 3 Preview and retrieve iPhone contacts
It will take you seconds to scan the data from iPhone, when it finish, you can find all data will be listed in the left side of the window. Choose "Contacts" to preview one by one, mark it and click "Recover" to restore them to your computer.


Note: Data found here includes deleted data and those still on your iPhone. If you only want back your deleted ones, you can refine the scan result by using the slide button at bottom to only display deleted items.

And no matter you have iPhone 5 or iPhone 4/4S and even other type of iPhone, you can also use iPhone Contacts Recovery to get back your contacts.

Wednesday, September 11, 2013

How to Recover Deleted Files on iPhone


Nowadays more and more people like to use iPhone, it is cool and fashionable to use it to send messages, take photos, store contacts and so on. So an iPhone may contain many important information about your life. But sometimes it occurs that you delete the data accidentally and then you may be crazy to lose some special photos, messages or something else. When you face the problem, you may need a software to help you.
iPhone File Data Recovery is just the software can help you to get back your information on your iPhone. You are also allowed to extract iTunes backup files of your iPhone so you can preview and check deleted files to restore. Just follow the tutorial to help you retrieve your data.
A free trial download version is available here.


Two versions are provides for you according to your computer: iOS Data Recovery (Mac) (for Mac users) and iOS Data Recovery (for Windows users). Here we take windows version for an example.

Part 1 Directly Restore Lost Data Files from iPhone 5 Device
First of all, download the right version of iOS Data Recovery. Install it on your computer and run it.

Step 1 Connect your Device to the Computer
Connect your iPhone 5 to the PC with a USB cable. The interface will be shown as follow. Select "Recover from iOS device" in the window and you'll be informed that your device is connected. Then click "Start" and continue.

Step 2 Wait for the Analyzing
Your device will be analyzed by the iPhone 5 data recovery. The analyzing process will last for some time, wait patiently now.

Step 3 Scan for Lost Data Files
When the analyzing process finishes, the program will start scanning for lost or deleted data files for you automatically. You can see the process and remaining time from the progress bar. Wait for the scanning results now.

Step 4 Preview and Check Lost Files to Recover
After the scanning, you will get the results listed in categories on the left in the window, such as "Camera Roll", "Photo Stream", "Contacts" and so on. Go to each icon and expand it. Preview the details and check those you want back. Click on "Recover" button to save them on your computer, thus all deleted or lost data coming back to your life.
Note: You can choose to "Only display the deleted items" at the bottom so you can find what you want to recover more quickly and conveniently.

Part 2: Scan and Extract iTunes Backup File to Restore iPhone 5
This way works well if you have synced your iPhone device with iTunes before.

Step 1 Run iOS Data Recovery on the PC
Download and install the program on your computer. Launch it and you will get the following interface. Navigate to "Recover from iTunes Backup File" and you can see all your previous iDevices' backup files are listed in the window. Select your device name and click "Start Scan".
Notes: Before performing the recovery successfully, do not sync your device with iTunes. Lost data files will be overwritten in that way and you won't get them back any more.

Step 2 Preview, Check and Recover
When you get the scanning results after some minutes, go to each file category and preview the details. You can go to "Camera Roll" and "Photo Stream" as well as "Photo Library" for lost pictures. Also, you can turn to "Messages" to find your deleted SMS. Check all you want to get back and click "Recover". All of them will be restored on your PC then.
After reading the procedures, you would have the knowledge of how to restore your data. And if you want to know more about iPhone recovery, just go to resources.

Wednesday, September 4, 2013

How to Restore iPhone from iTunes Backup


Many iPhone users may know that iTunes can back up the data. You can find your photos, contacts, music and other files from iTunes. But you cannot be allowed to scan or get back directly from it. And today I will introduce a software to help you recover the data from your iTunes. No matter you have iPhone 5, 4S, or 4, you can use iPhone Data Recovery to retrieve. All you need to do is downloading a software and then you can restore iPhone from iTunes backup.
iPhone Data Recovery is a useful and 100% safe software designed to help you recover deleted or lost data such as contacts, SMS, photos, videos, call history, notes, bookmarks and more from iTunes backup.
Before recovery, download and install iPhone Data Recovery on your computer. Run the program and then follow the steps below.


Tips: Do not connect your iPhone to the computer and sync it with iTunes again once you find the data loss on your iPhone. Or the backup file will be overwritten by the content on your iPhone, and can't find the lost data any more.

Step 1. Select the Backup File to Scan
Turn to "Recover from iTunes Backup File" in the main interface, then, choose the backup file for your iPhone if there is more than one backup file. Click "Start Scan" to exact backup file from iTunes.

Step 2. Preview and Check data to Recover
Wait for the scanning results and then you'll be presented with data files on the left in a list. Choose one file and you can preview the detailed contents as you like. Check those you want back and press "Recover" button to retrieve them. Choose one folder on your computer and save them.
Step 3. Do Backup well
Remember to back up your device constantly on your computer in case of losing your important data.
Note: iPhone Data Recovery also allows you to recover deleted or lost data directly from iPhone 5/4S/4/3GS, without needing iTunes backup.

After three steps you can convert the data you want to get back. And if you want to know more about how to recover lost data from iOS, just click http://www.recovery-android.com/.